Continuing on my progress with the tuorials featured on Pluralsight, I moved onto Fluids. The set of tutorials went over some of the basics of the Fluid shelf tools, and explained in some detail exactly what a fluid in Houdini consisted of, as well as how to manipulate them using various methods. On top of this the tutorial briefly covered how to properly optimise fluid simulations, something which became very apparent early on when working with large bodies of water such as FLIP tanks, while my PC is quite high-spec, some of the simulation experiments I conducted during this week slowed my machine down to a crawl, some of which elapsed well over 2 hours just to simulate, which I will go into more detail further into this post. Overall the tutorials were very helpful is gaining a basic understanding of fluids in Houdini and did a great job of maintaining my interest throughout.
Aims
- Learn the basics of fluids in Houdini
- Produce test simulations and renders of my experiments
- Time my simulations and renders to better plan ahead to my final outputs
FLIP Fluids are the standard fluids that I will be working with throughout my time with Houdini, FLIP stands for Fluid Implicit Particle, the reason for this title is that the FLIP system is a hybrid of older methods for producing fluids in Houdini. Before FLIP, fluids were either rendered using volume or particles, the problem with these methods were twofold, volume was an accurate method for producing fluids, but used cumbersome techniques when producing the data for their behaviour (Similar to the method of volume collision detection mentioned in my previous blog post), this resulted in very slow simulation times. And particle fluids were erratic in their behaviour, and could result in unruly simulations. FLIP being the hybrid, takes both of these methods and uses them in tandem with eachother, resulting in an accurate but still somewhat effecient method of calculating fluids.
Upon creating a fluid from a piece of geometry, a large bounding box will surround the particles, this represents the limit of which the fluid can exist within the scene, the use of this being that a clear cutoff point can be created, so when parts of the fluid move out of the viewport, they no longer need to be calculated and make the simulation more efficient.
Looking at the node view, when creating a fluid two nodes are created at the object level, the fluid and the fluid interior, these two nodes mainly effect the appearance of the fluid when rendering out, whilst the tutorials did not go into any detail regarding this, I will have to make a mental note to research how to apply shaders to my fluids, as when I am creating my final outputs, keeping the default shader on my simulations will not result in a realistic look.
Speaking of realism, an important note I made when experimenting with fluids was that not applying any forces other than gravity to my fluids resulted in a very unrealistic look, as all the particles were sticking to the same velocity and direction. An easy method of combatting this was to add turbulence and randomness to the fluids, I achieved this using the ‘Curl noise’ and ‘Vortex’ options within the fluid source node. This resulted in the fluid twisting from the vortex and added some randomness to the initial velocity of the particles with the curl noise option, making my fluid look similar to water ejecting from a faucet.
For this simulation I wanted to do a quick test on my simulation time, according to the fluid output node, at it’s most dense point there were 50,000 particles which made up my fluid. For a 240 frame simulation of a fluid emitter, with both vortex and curl noise added, the simulation took 4 minutes and 30 seconds, overall a good time for developing the look of the fluid, but if I were to render I would obviously up the amount of particles significantly.
Next I moved onto FLIP tanks, unlike fluid emitters, the FLIP tank on its own consists of a constant number of particles and does not move outside of it’s predefined area. I noticed some recent changes to the FLIP tank when researching into the latest version of Houdini, now there is a feature call ‘Narrow Band’ when creating a tank, basically this simulates only the active parts of the tank, leaving any particles under the surface that don’t move unrendered, supposedly this saves on computing power but a quick test of my machine gave a difference of 1 second in simulation time. While it did not make a difference in my FLIP tank simulation, I imagine that a tank with a lower particle separation would benefit greatly in simulation time.

Example of the effects of narrow band.
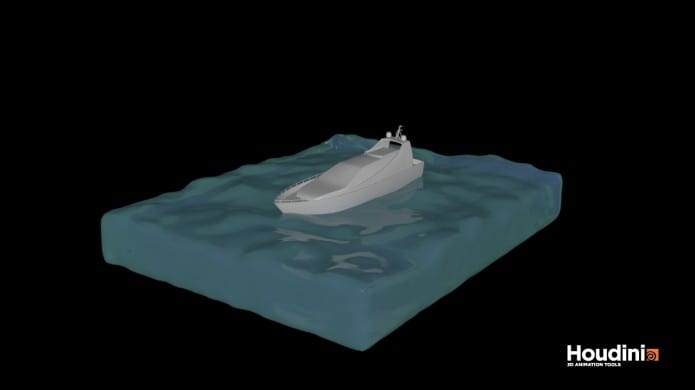
Below I have embedded a quick render of my flip tank simulation, I added a POP wind node to the DOP network to simulate the waves of the ocean, and using one point of the boat to interact with the motion. While the boats reaction to the water looks quite unnatural, the fluid itself looks somewhat realistic. To improve on this I would first change the motion of the boat, perhaps by inserting some keyframes to smooth out the animation, and secondly I would lower my particle separation to create a more realistic looking fluid.
Simulation Time – 4 minutes 7 seconds
Render Time – 1 hour 32 minutes