Moving on from fluids and oceans, I decided to try my hand at Pyro FX, since this was going to be a section of my final output. Some initial teething problems arose when it came to finding learning resources for Pyro FX in Houdini, whereas previously I had mainly been utilising tutorials available on Pluralsight, I found that the Pyro tutorials available there were well beyond my current skill level within the software. The tutorial went into some depth regarding vector operators, something which I am totally unfamiliar with as well as some scripting, while I usually enjoy a challenge when it comes to learning new software skills, it became very apparent that I was out of my depth.
After discussing the issue with my tutor, we deliberated whether it would be best to utilise this learning resource while stating my ignorance on the subject or not, while he did encourage me to follow along with the video, I did not think it very useful to building my skills, since I wouldn’t actually be learning the necessary methods, but rather just copying the work. I have made a mental note of this set of tutorials however, and will be revisiting them once I feel more comfortable with Houdini.
After some hunting around the internet, I found that the most useful resource available to me regarding Pyro FX was in fact SideFXs own documentation which was available from the user guide within the software itself, after briefly reading through their own explanation of the Pyro FX tools, I began to grasp how to control them.
So when creating a flame for example, a series of nodes is created with the DOP network, much like what occurs when creating FLIP objects, the key difference being the solvers created and the parameters available within them. Unlike FLIP, attached to the Pyro solver is a resize container node, which controls the bounding box which initially surrounds the fire simulation, this is a very important node when creating Pyro and optimizing the scene. The bounding box changes dynamically depending on the size of the fire simulation, but will limit itself based on upper and lower bound parameters, for my own purposes, I found that turning off the ‘clamp to maximum bounds’ attribute suited my purposes better, so as not to cut off any part of my simulation without having to fiddle around with two seperate values. This sort of thing would definitely be more important when working with a power intensive scene, but my scenes were relatively quick to render and simulate, so turning off the clamp did not affect these times too much.
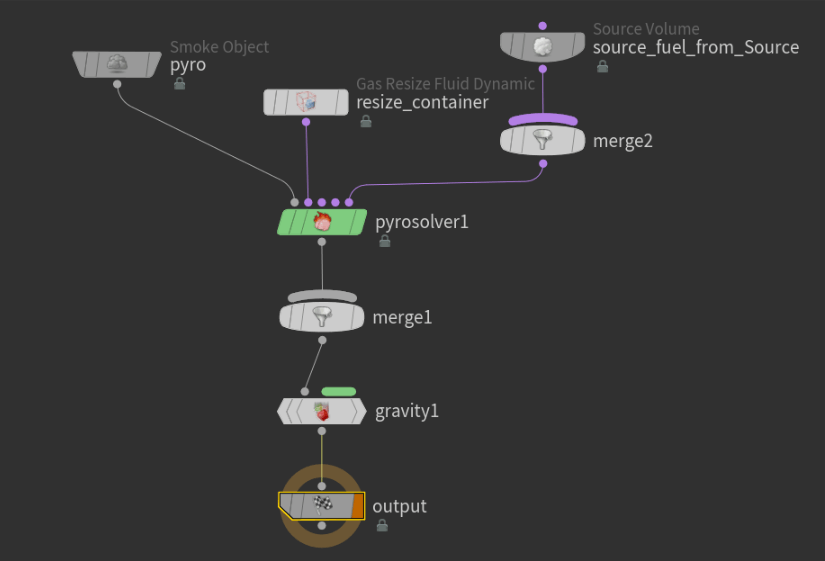
The nodes created upon using the Pyro FX tools.
Also when creating a Pyro sim there are two important values when it comes to the generation of fire or smoke, these values are Fuel and Temperature, Fuel controls where the pyro sim births from, whilst temperature is the value which tells the fuel when to burn, so where fuel exists and temperature is above a certain point, burn is created. Additionally on the fuel source, much like a Flip source, noise can be added to create more turbulence from it’s origin, like Flip this creates a more photoreal, natural look when it comes to the burn.
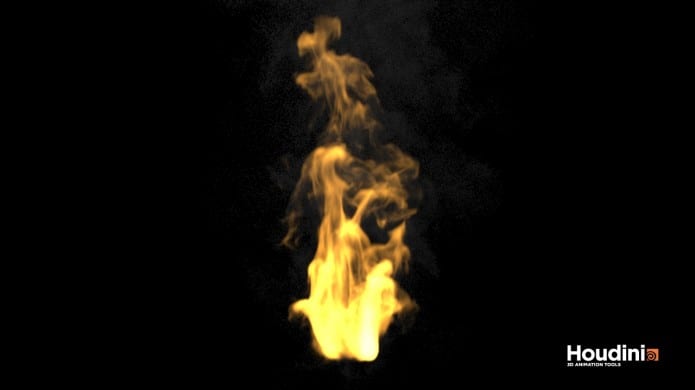
These are my initial test renders of both fire and smoke, while the quality is not the highest, I think these show off what is possible with Pyro FX in a relatively short amount of time. I will continue to work and experiment with Pyro leading into my final output.
Evaluating these renders and gathering some feedback, the fire was of a very low resolution and it’s interaction and burn was quite uninteresting, to improve this I would most likely change the source object which the flames emit from, as well as changing the various attributes in the Pyro solver to create a more turbulent flame with more character. The smoke on the other hand, while quite satisfying to look at, and of a relatively high quality, looks quite alien, in that it appears like the smoke is in a vacuum, since there is very little dissipation. But for an initial set of test renders, both have displayed to me what is possible with Pyro FX and how I should move forward and improve my skills in this area.