Initial Ideas – Semester B

For semester B, I wanted to use my experiences and knowledge gained from my previous project to dictate where i was to place my efforts going forward. While I did enjoy my work in modelling with maya, I wanted to further branch out into 3d and try my hand at something similar whilst also wildly different and experimental.

Recalling a conversation late last year with escape studios, one of the key points made was that currently, the industry is looking for FX artists, more specifically people trained in Houdini.

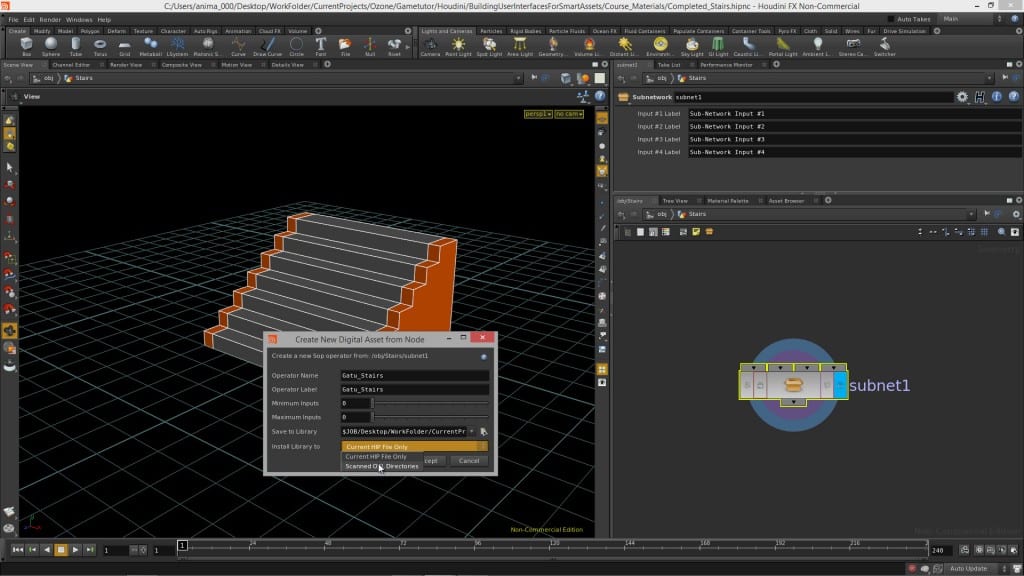
hou_BuildingUserInterfaces_lesson001

The Houdini interface.

After some initial research into the Houdini software package i found where it differs from other 3d packages is that it focuses on procedural generation. Whilst standard modelling tools and procedures are available within, where Houdini shines is its ability to produce complex dynamics, particles and volumetrics, which are typically used to create simulations (E.g, Fire, smoke, water, Etc.)

Looking into a few houdini showreels, it becomes apparent just how powerful the software is.

Doing some research into the learning process, which will take up most of this blog, according to various VFX forums, Houdini a notoriously complex piece of software to learn. Employing the fail-fast approach from last semester, I will begin immediately working with the software and attempt to have at least one output, no matter how small at the end of each week, failing this I will go into detail what exactly didn’t work when trying to achieve this goal.

Thinking towards an output, I have considered at this point making a compilation of simulations made within the software which I will work on throughout the coming weeks, working on my feedback from last semester I will try to include all of my experiments within this output.
Final Showreel

https://www.youtube.com/watch?v=CCa_3JO7TfI

Reflection

Camera Mapping

This shot is definitely my least favourite part of the showreel, while it does work, it doesn’t do well to show off the textures since it wasn’t properly rendered and is just a recording of my viewport, which also prevented me from adding any post processing effects such as depth of field, which would have greatly improved the scene. The improvements to this scene that I would make would obviously be to figure out the method of getting my renders to work, either by trying a different standalone rendering engine, or updating my version of Arnold / Maya.

Tracking

Very pleased with how this one turned out, since I managed to get my solve down to 0.18 as well as accurately lighting the scene and correctly applying my textures on the signpost. To improve this scene I would definitely consider adding more models and doing further work in texturing to make it look more realistic, but for the purposes of showing off the accuracy of my track I think the shot works quite well.

Modelling

Incredibly proud of this shot, whilst the topology of my model isn’t very clean, the final render and textures do very well to sell the realism and enable to model to retain a lot of detail in close up, I’m especially happy with my edge work around the analogue sticks, as I think they do a good job of reflecting the light in the scene. To improve I would first clean up the geometry, making sure to get rid of any triangles or ngons, and also I would do some more texturing work, such as adding some more normal detail to create a groove around the base of the controller.

Final Shot – Camera Map

https://www.youtube.com/watch?v=PpHLoL3EpcI

Problems Encountered

The main problem I found for this scene was that when rendering none of the rendering engines for Maya were working properly for my scene, either the render came out as a completely black screen or alternatively looked fine within the render view but got ridiculously dark when saving the image sequence. To remedy this I first attempted to google the problem to see if any other users were encountering the same problem as me, as I found, there were multiple posts about this exact problem, solutions ranged from changing the gamma settings to reconfiguring the lighting of the scene, I tried most of the solutions given but none seemed to work on my machine. I then took the files and attempted to render on my housemate’s PC, only to find upon pressing the render still button, Maya crashed multiple times. I was very frustrated during this process as I had made a few test renders of previous camera maps which had worked fine.

I then contacted my tutor to see if he could help me in remedying the problem, after looking for more solutions he found a forum post stating that a user with the same problem had contacted Solid Angle who informed him that it was a known bug with Arnold renderer and that a future update will fix the problem. My tutor then recommend that I look into screen capturing my scene and animation as a workaround.

After some messing around within the software I found that I could just use the playblast feature within Maya, which renders out an image sequence using the standard viewport, while the sequence was obviously not as high quality as an actual render, it worked quite well and was sufficient enough to be placed in my final showreel.

Reflecting on this, I have to take responsibility for leaving my render so close to the deadline, as well as not properly researching render engines in Maya, in the future I must remember to look into this at a much earlier point. Whilst it was a very hard lesson to learn, it has definitely affected how I will approach future projects.

Final Shot – Controller

https://www.youtube.com/watch?v=3X_JJTlmedk

My final model can be found on sketchfab here.

Problems Encountered.

Upon rendering my textured model in Maya, I found that certain edges, especially those around the handles of the controller, were not rendering properly. I had anticipated this problem upon reaching the end of my modelling process as my topology was quite messy, with a lot of triangles in the geometry of the mesh. I wasn’t sure if this was what was causing my lighting problem, so I first attempted to relight my scene multiple times to see if I could remedy this to no avail, I then exported my mesh into blender to attempt to light it there, where I encountered the same problems. I could safely assume at this point that it was my mesh that was causing the problem, but since I had already modelled, smoothed and UV’d the controller, it was too late to start it all over again, as the entire process had taken me around 15 hours in total.

To work around this I decided to use Sketchfab to display my model, as the lighting in sketchfab was working correctly, so I exported my model from Maya as an .fbx so that the animation applied to it would also be contained in the export, I then manually plugged in all my textures into sketchfab, fullscreened the preview and screen recorded the wireframe view, UV view and the final render.

Reflecting upon these problems, my workaround was both a negative and a positive. Negative because it prevented me from compositing my model into a still image, but positive as it was much simpler and of a higher quality when placed into Sketchfab. Overall, the lesson learned from these problems is that the topology of a model is very important when it comes to rendering, and that triangles and ngons will negatively effect any rendering engine.